
Ah, the croissant bread loaf – a marvel in the world of baking that bridges the gap between the flaky, buttery goodness of a croissant and the hearty, sliceable nature of bread. It’s like the best of both worlds, wrapped up in a golden, crispy crust that’s just begging to be torn into. Now, before we dive into the nitty-gritty of crafting this bakery masterpiece, let’s set the stage for what’s to come.
Imagine your kitchen filled with the aroma of freshly baked bread, a scent so inviting it could make even the most steadfast dieter weak at the knees. That’s the magic of croissant bread loaf, a baking project that’s as rewarding as it is delicious. But don’t let the thought of making pastry intimidate you! We’re about to embark on a step-by-step journey that will demystify the process, making it accessible to bakers of all skill levels.
From the intricacies of laminated dough to the final, glorious rise, we’ll cover it all. So, roll up your sleeves, and let’s get started on this culinary adventure that promises flaky layers of joy in every bite!
The Basics of Croissant Bread Loaf
What Exactly is Croissant Bread?
At its heart, croissant bread loaf is a delightful fusion of croissant dough, lovingly baked in the form of a loaf. This ingenious creation offers the same mouth-watering flavors and textures we all adore in traditional croissants but presents them in a more convenient, sliceable form. Whether you’re craving a decadent grilled cheese or a simple, buttery slice to accompany your morning coffee, croissant bread loaf rises to the occasion.
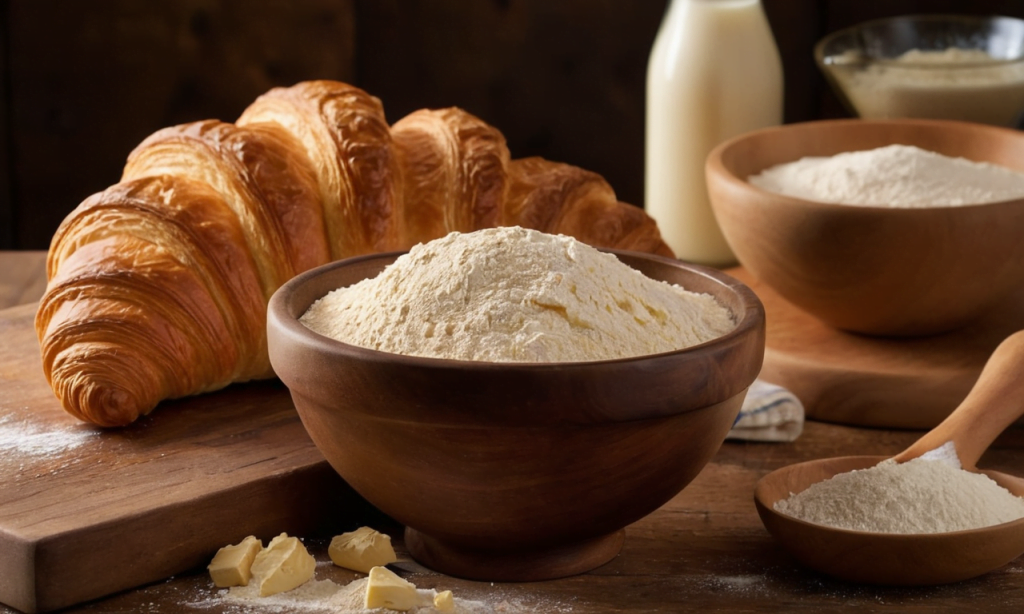
The Ingredients: Simplicity Meets Elegance
You might think that something this delicious requires a pantry full of exotic ingredients, but that’s the beauty of croissant bread loaf – its simplicity. With just a handful of staples like flour, butter, salt, yeast, milk, and sugar, you’re well on your way to bakery-level indulgence. And let’s not forget the humble egg, which lends a glossy sheen to the crust, making it as beautiful as it is tasty.
Laminated Dough: The Secret Behind the Layers
The term “laminated dough” might sound like something out of a fancy French patisserie, but it’s simply the technique of folding butter into dough multiple times. This process creates those irresistible layers that croissants are famous for. And while it might seem daunting, fear not! With a bit of patience and some helpful tips, you’ll be laminating dough like a pro in no time.
Step-by-Step: Demystifying the Process
Embarking on the journey of making croissant bread loaf is like setting off on a baking adventure, with each step bringing you closer to that flaky, buttery treasure. From mixing the dough to the final rise, we’ll walk you through every part of the process, ensuring that you’re well-equipped to tackle this baking challenge. And remember, while the road might seem long, the result is more than worth the effort.
So, there you have it, the groundwork for our croissant bread loaf escapade. Stay tuned as we dive deeper into the art of laminating dough and shaping our loaf to perfection. The journey might be sprinkled with flour and dotted with butter, but oh, what a delicious journey it will be!
The Art of Laminating Dough
Understanding Lamination
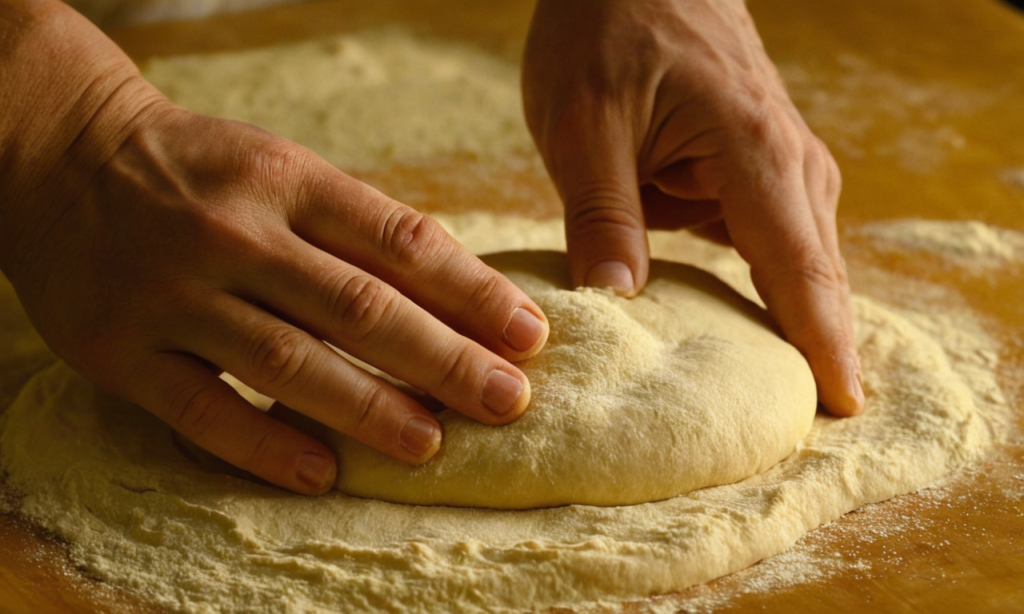
Lamination is the heart and soul of our croissant bread loaf, the very essence that gives it those dreamy, airy layers. But what exactly is it? In the simplest terms, it’s a technique where butter is folded into the dough multiple times, creating thin, alternating layers of butter and dough. As the loaf bakes, the butter melts, producing steam that separates these layers, resulting in that signature flakiness.
The Butter Block: A Key Player
Unlike traditional croissants, where a solid butter block is used, our croissant bread loaf takes a slightly different approach. We’ll be strategically placing pieces of butter on the dough, ensuring that every bite has that perfect balance of dough and butter. It’s a little twist that makes a big difference in the texture and flavor of our loaf.
Tips for Successful Lamination
Laminating dough might sound like a task reserved for seasoned bakers, but with these handy tips, even novices can achieve those coveted layers:
- Embrace Imperfections: If air bubbles appear or the dough tears slightly, don’t fret. These minor hiccups won’t ruin your loaf; they’re just part of the process.
- Temperature Matters: Keeping the dough and butter at similar temperatures is crucial for smooth lamination. If the dough becomes too tough to roll, let it rest for a bit. This allows the gluten to relax, making your job much easier.
- Patience is Key: The process involves multiple rounds of rolling, folding, and chilling. Rushing can lead to overworked dough or butter that’s too soft, so take your time and enjoy the journey.
Step-by-Step Lamination
Now, let’s get down to business. We’ll start by rolling out our dough into a rectangle, then strategically placing our butter. After the first fold, akin to closing a book, we’ll chill the dough to keep everything nice and firm. This process is repeated, with each fold bringing us closer to that perfect loaf. It’s a dance of dough, butter, and rolling pin, with each step carefully choreographed to achieve those beautiful layers.
As we wrap up this section, remember that lamination is more than just a technique; it’s what sets our croissant bread loaf apart, giving it that irresistible texture and flavor. So, take a deep breath, roll up your sleeves, and let’s laminate our way to baking glory!
Stay tuned for the next part, where we’ll dive into shaping our loaf and preparing it for the final rise. The aroma of freshly baked bread is just around the corner, and trust me, it’s worth the wait!
Shaping and Rising to Perfection
The Final Shape: Rolling and Cutting
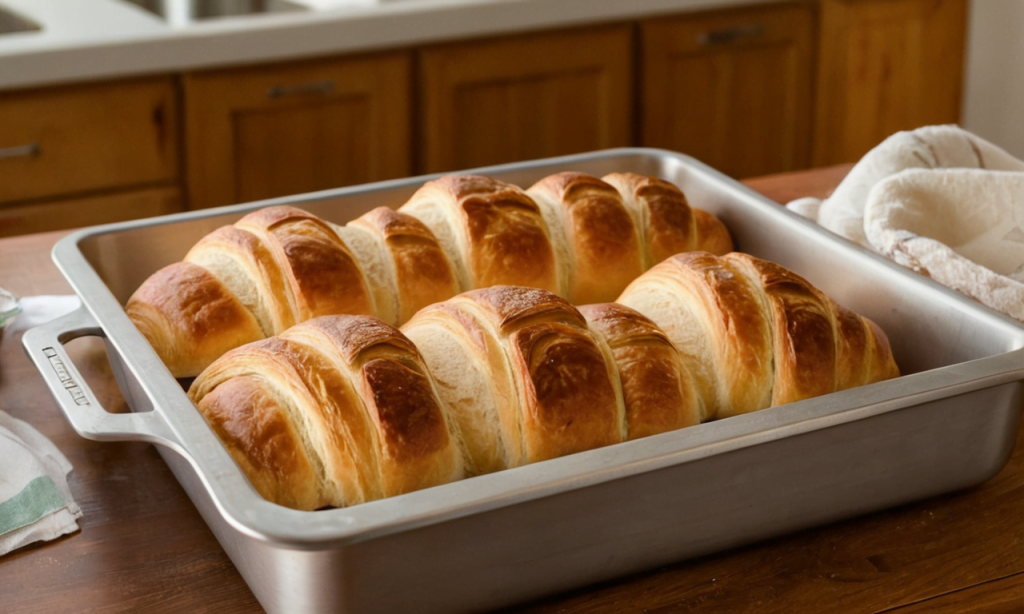
After mastering the art of lamination, we’re on to the next exciting phase: shaping our croissant bread loaf. This is where our dough transforms from a layered sheet into a form that’s ready for the oven. We’ll start by rolling the dough into a final rectangle, then carefully rolling it up like a log. This isn’t just any roll, though; it’s the precursor to those beautiful, spiraled layers in each slice of our loaf.
Once our dough is snugly rolled, we’ll slice it into thick, even pieces. These aren’t just slices; they’re the building blocks of our loaf, each one packed with layers waiting to puff up into flaky perfection. Arranging these pieces in a loaf pan might feel like a simple task, but it’s actually a crucial step that ensures our loaf bakes evenly and rises beautifully.
The Second Rise: Patience Pays Off
Now, it’s time for our dough to take its final nap, a process known as the second rise. This is when the magic really happens, as the yeast goes to work one last time, puffing up our dough and setting the stage for those light, airy layers. Covering our loaf pan and finding the perfect spot for this rise is key; we want a warm, draft-free environment that encourages our dough to rise without rushing it.
This rise is more than just waiting; it’s about giving our dough the time it needs to develop its full flavor and texture. So, while it might be tempting to rush this step, remember that good things come to those who wait. And in this case, what awaits is a loaf of croissant bread that’s truly worth savoring.
Preparing for the Oven: The Final Touches
Before our loaf makes its journey into the oven, there’s one last step: the egg wash. This simple mixture of egg and water isn’t just for looks; it’s what gives our loaf that golden, shiny crust that’s so characteristic of the best bakery breads. Brushing this mixture over our risen dough is like putting the finishing touches on a masterpiece; it’s what sets our croissant bread loaf apart, making it not just delicious, but also a feast for the eyes.
As we conclude this section, our loaf is almost ready to meet the heat of the oven, a moment that’s both exciting and a bit nerve-wracking. But fear not, for we’ve carefully prepared every step of the way, ensuring that our loaf has the best possible chance to transform into the flaky, buttery bread we’ve been dreaming of.
In the next part, we’ll dive into the baking process, discussing temperatures, times, and how to know when our loaf is perfectly baked. The finish line is in sight, and oh, what a tasty finish it promises to be!
The Baking Process and Final Touches

The Oven Awaits: Baking Your Masterpiece
The moment of truth has arrived: it’s time to bake our croissant bread loaf. Preheating the oven is the first critical step, setting the stage for the transformation from dough to golden-brown delight. The right temperature is crucial here; too hot, and the outside will burn before the inside is done, too cool, and our loaf won’t achieve that beautiful rise.
As we slide our loaf into the oven, anticipation builds. This isn’t just baking; it’s the culmination of all our efforts, a dance of heat, dough, and time that results in something truly special. The aroma that begins to fill the kitchen is a sign that something magical is happening inside that oven.
Timing is Everything
Baking is a science, and timing is a key part of that science. Keeping an eye on the clock is essential, but so is understanding that every oven is a bit different. About halfway through, you might need to tent the loaf with aluminum foil to prevent over-browning. This simple trick ensures that our loaf bakes evenly, achieving that perfect balance of crispy crust and tender, flaky interior.
The Final Test: Is It Done Yet?
Determining when the loaf is fully baked is perhaps the most nerve-wracking part of the process. The golden crust is a good indicator, but the true test lies within. An instant-read thermometer is a baker’s best friend here, offering a peek into the heart of the loaf to ensure it’s baked to perfection. When it reads the right temperature, you’ll know it’s time to take your masterpiece out of the oven.
Cooling: The Final Step in the Baking Ballet
Resisting the urge to slice into your freshly baked loaf immediately is a challenge, but patience is a virtue that pays off in the world of baking. Allowing the loaf to cool on a wire rack is essential for the structure to set, ensuring that each slice is perfect. This cooling period is the final act in our baking ballet, a time to admire our work and anticipate the joy of that first bite.
As we wrap up this section, our croissant bread loaf is nearly ready to enjoy. The journey from ingredients to finished loaf is a testament to the art and science of baking, a process that’s as rewarding as it is delicious. Stay tuned for the final part, where we’ll explore the best ways to enjoy and share your freshly baked croissant bread loaf. The end is in sight, and it promises to be as satisfying as the scent of freshly baked bread that’s now filling your kitchen.
Savoring and Sharing Your Croissant Bread Loaf
The First Slice: A Moment to Savor
The wait is over, and it’s finally time to slice into your golden, flaky croissant bread loaf. This moment is more than just cutting into a baked good; it’s the culmination of your hard work, patience, and passion for baking. As you slice through the crispy crust and into the tender, layered interior, take a moment to appreciate the beauty of what you’ve created. Each layer, each flake, tells the story of the journey you’ve embarked on to bring this loaf to life.
Serving Suggestions: Elevating Your Loaf
Your croissant bread loaf is a masterpiece on its own, but why not elevate it with some creative serving suggestions? Imagine it toasted to golden perfection, the butter melting into each flaky layer, or perhaps as the base for an indulgent French toast, soaked in a rich, custardy mixture and cooked to perfection. The possibilities are endless, from savory sandwiches with gourmet fillings to simple spreads that let the loaf’s flavors shine.
Sharing the Love: Bread as a Bond
Baking isn’t just about the end product; it’s about the joy it brings, both to the baker and those lucky enough to share in the bounty. Your croissant bread loaf is a perfect opportunity to bring people together, to share in the warmth and comfort that only homemade bread can provide. Whether it’s a family breakfast, a gathering of friends, or a gift to a neighbor, your loaf is a testament to the power of baking to connect and comfort.
Preserving the Perfection: Storing Your Loaf
While your croissant bread loaf is best enjoyed fresh, life sometimes calls for saving some for later. Proper storage is key to preserving the texture and flavor of your loaf. Wrapped in parchment and stored in an airtight container, your loaf can maintain its quality, ready to be enjoyed when the craving strikes. And if you find yourself with more bread than you can consume, remember that it freezes beautifully, ready to be thawed and revived in the oven for a taste that’s as good as the day it was baked.
As we conclude our journey from dough to delectable loaf, remember that each step, from mixing to slicing, is a part of the baking adventure. Your croissant bread loaf is more than just a recipe; it’s a journey through the art of baking, a journey that’s as rewarding as the delicious bread you’ve created. So, here’s to the bakers, the creators, and the sharers – may your kitchens always be filled with the warmth of freshly baked bread.
Exploring Variations and Advanced Tips
Creative Twists on the Classic Loaf
Once you’ve mastered the classic croissant bread loaf, why not explore some creative variations to spice up your baking repertoire? Imagine incorporating a swirl of cinnamon sugar for a sweet, aromatic twist, or adding finely chopped herbs and grated cheese for a savory version that’s perfect as a dinner accompaniment. The beauty of this loaf lies in its versatility, allowing you to tailor it to your taste or the occasion.
Advanced Techniques for the Ambitious Baker
For those looking to elevate their baking skills further, consider experimenting with different lamination techniques or incorporating unique ingredients into the dough. Playing with the types of flour, adding whole grains for texture, or infusing the butter with flavors like garlic or rosemary can transform your loaf into a gourmet creation that’s sure to impress.
The Art of Pairing: Complementing Your Loaf
A beautifully baked croissant bread loaf deserves to be paired with accompaniments that enhance its flavors and textures. Consider the richness of the loaf when choosing spreads, dips, or toppings. From artisanal jams to high-quality cheeses, the right pairing can turn a simple slice of bread into a culinary experience. For a truly indulgent treat, explore the world of homemade spreads and artisanal cheeses, finding the perfect match for your loaf’s buttery layers.
The Joy of Sharing: Baking as a Gift
In the world of baking, few things are as satisfying as sharing your creations with others. A homemade croissant bread loaf, wrapped in a simple, elegant packaging, makes for a thoughtful and heartfelt gift. Whether it’s a housewarming present, a gesture of appreciation, or a contribution to a communal meal, your loaf is a symbol of care and craftsmanship, a gift that’s as enjoyable to give as it is to receive.
As we wrap up this comprehensive guide to baking the perfect croissant bread loaf, remember that each loaf you bake is a reflection of your journey as a baker. From the first mix of ingredients to the final slice, every step is an opportunity to learn, experiment, and, most importantly, enjoy the process. So, keep baking, keep sharing, and let each loaf be a testament to the joy and artistry of baking.
FAQs: Croissant Bread Loaf
Q1: Can I use all-purpose flour instead of bread flour for my croissant bread loaf?
A1: Yes, you can use all-purpose flour, but the texture might be slightly different. Bread flour has a higher protein content, which helps develop more gluten, giving the bread a slightly chewier texture and better rise. All-purpose flour will still work well, though, and yield a delicious loaf.
Q2: My dough keeps tearing during lamination. What am I doing wrong?
A2: Dough tearing can happen for a few reasons. It might be too cold, making it less pliable, or the butter might be too hard. Ensure your dough and butter are at similar, manageable temperatures. If tearing occurs, patch it up with a little extra flour and proceed gently.
Q3: How do I know if my dough has risen enough during the second rise?
A3: The dough should look visibly puffed up and fill the pan more than before. A good rule of thumb is that it should rise to about 1 inch below the rim of the loaf pan. Gently poking the dough with a finger can also help; if the indentation slowly bounces back, it’s ready.
Q4: Can I add fillings like chocolate or cheese to my croissant bread loaf?
A4: Absolutely! Adding fillings can turn your loaf into a delightful treat. Just be mindful of the moisture content of your fillings, as too much moisture can affect the dough’s texture. Dry, solid fillings like chocolate chips or grated hard cheese work best.
Q5: My croissant bread loaf didn’t come out as flaky as I hoped. What can I improve?
A5: Achieving flakiness is all about maintaining distinct layers of dough and butter. Ensure your butter is cold enough during lamination to prevent it from blending too much into the dough. Also, be careful not to overwork the dough, as this can develop too much gluten, leading to a less flaky texture.
Q6: How long can I store my croissant bread loaf, and what’s the best way to keep it fresh?
A6: Your loaf will stay fresh for about 2-3 days at room temperature when wrapped in parchment paper and stored in an airtight container. For longer storage, you can freeze the loaf for up to 3 months. Wrap it securely in plastic wrap and then aluminum foil before freezing. Thaw at room temperature or in the oven for best results.
Q7: Can I make the dough ahead of time and bake it later?
A7: Yes, you can prepare the dough and go through the lamination process, then cover and refrigerate it overnight. When you’re ready to bake, let the dough come to room temperature, shape it, let it rise, and then bake as directed.
These FAQs aim to address common concerns and tips for achieving the best results with your croissant bread loaf. Happy baking, and may each loaf bring you closer to perfecting this delightful baked good!